

You have a 60-slide deck that worked pretty well in a live session. Now it needs to be in a self-paced course: in the LMS, trackable, and just good enough to carry your name without any facilitator in the room.
The stakes here differ depending on where you actually sit. If you run L&D internally, a weak conversion of PowerPoint to eLearning will quietly burn the budget you fought for and just make your next business case for L&D harder. If you sell any kind of training programs, the converted modules are your product, and your cost of producing them is the thing between a nice recurring revenue line and an eLearning project you’d rather not repeat.
In this guide, we cover both halves of the job to convert PowerPoint to eLearning courses. First, your decision of which of the three routes will fit your budget, timeline, and tracking requirements. Then the work itself, walked through in 2 different tools so you can tell what’s genuinely tool-specific and what isn’t.
In This Article
- 3 ways to convert a PowerPoint to eLearning
- The three routes compared
- Step by step: how to convert PowerPoint into eLearning
- How to triage a deck before you build
- What breaks on import and how to fix it
- Which standard to publish in
- Accessibility requirements you can’t add later
- What conversion actually costs
- Five mistakes that make a converted deck fail
3 Ways to Convert a PowerPoint to eLearning
Every eLearning conversion project essentially ends up in one of these three places. They actually differ less in output quality than in what you’re actually willing to spend to get there, and in whether you need LMS to prove anything afterward.
Route 1: Export to HTML5 or Video
PowerPoint publishes to video natively, and just requires a handful of free tools to wrap a deck as HTML5. Then, you’ll record narration over slides, export, and host the file anywhere: intranet page, a shared drive, YouTube unlisted.
It’s the fastest route and costs nothing beyond your time. It also gives you no completion data, no scoring, and no interaction. That’s fine for a product update or a pre-read. It isn’t fine for anything you need to evidence later.
Route 2: Authoring Tool, Published as SCORM
You can import the slide deck into iSpring, Storyline, Rise, Captivate, Lectora, or ActivePresenter. Add suitable narration, knowledge checks, and navigation, then publish it as SCORM or xAPI. Then finally upload it to the LMS.
It’s the only route that can reliably give you tracking, scoring, and real interactivity, and where you’ll have full control of the output. The cost here is a license and a learning curve, though if you’re a training provider, that license cost is amortized across every project you’ll start to build. If you haven’t committed to a tool yet, compare the best elearning authoring tools against the kind of interactions your content actually needs rather than against feature lists.
Route 3: AI Conversion Platforms
Simply upload the deck, and the platform will generate a structured course: sectioned content, auto-written quiz questions, sometimes synthetic narration. You can use Coassemble, Coursebox, and other similar tools for this.
It’s genuinely useful for a first draft, but particularly on content-heavy decks where restructuring and instructional design work is deeply needed – it may not be a suitable route for you. There will always be a quality ceiling: questions tend toward recall, tone gets flattened, and the output would need a human review pass before it ships. The realistic use is drafting speed rather than replacement, which is also where ai for instructional design tends to earn its place – on the mechanical restructuring, not on the design decisions.
Three Routes Compared
Scored against the things that actually decide the route: what it costs, how long it takes, and whether your LMS gets anything usable at the end.
| HTML5 / Video | Authoring Tool | AI Platform | |
|---|---|---|---|
| Cost | Free to low | Annual license, amortized across projects | Free tier to low monthly |
| Build time, 60 slides | Hours | Days to weeks | Hours, plus a mandatory review pass |
| LMS tracking | None | Full, SCORM or xAPI | Usually SCORM export |
| Interactivity | None | Anything you can design | Quizzes, limited branching |
| Skill required | Low | Moderate to high | Low to build, high to review well |
| Control of output | Full | Full | Partial |
| Best for | Pre-reads, announcements, updates | Compliance, certification, client deliverables | First drafts, high-volume back catalogues |
The Short Version
- Need completion or score data? Route 2. The other two either can’t, or can’t reliably.
- Content is informational and nobody’s auditing it? Route 1, and stop there.
- Converting a large back catalogue on a deadline? Route 3 for the draft, Route 2 for the modules that matter most.
- Selling the module to a client? Route 2. Your margin depends on owning the source file.
If the deck came out of a classroom rather than a desk, the conversion is closer to an ilt to elearning services project than a file export, because the facilitator was carrying content that was never written down.
Step by Step: How to Convert PowerPoint into eLearning
Here are seven steps to convert your slide deck into an eLearning course. Note where the authoring tool appears: step six of seven. Most guides open at import, which quietly assumes the deck is the project. It isn’t. The deck is source material.
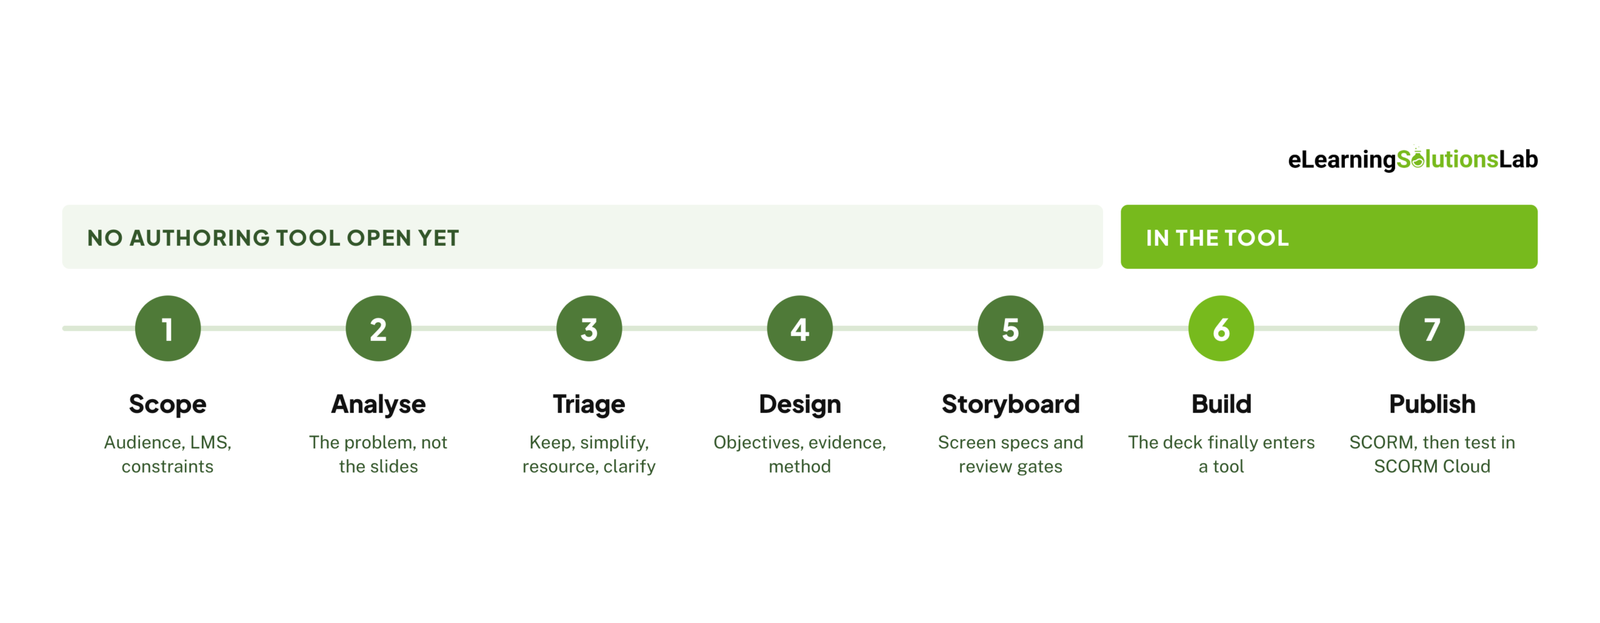 Step 1: Pin Down What You’re Actually Building
Before anything else, you need to confirm your audience, deliverables, duration, modality, authoring tools, LMS, what actually needs to be tracked, accessibility requirements, who approves, and when.
Write down anything that you don’t know yet.
It may sound administrative, but it isn’t really – it’s essential. Every one of these constraints- design, “self-paced, Rise, no custom media budget, WCAG 2.1 AA, sign-off by two stakeholders” will produce a completely different course from the same deck than just “blended, Storyline, dedicated developer, internal audience only”. And discovering that constraint at build time means actual rework.
Step 2: Separate the Problem From the Slides
You need to answer the question first: what’s the performance problem, can training move it, what do people do now, what should they do instead, and where will they apply it?
This is also the step where you really find out that maybe six of the SME’s favorite slides can address a problem the business or client didn’t ask you to solve.
Step 3: Triage the Content
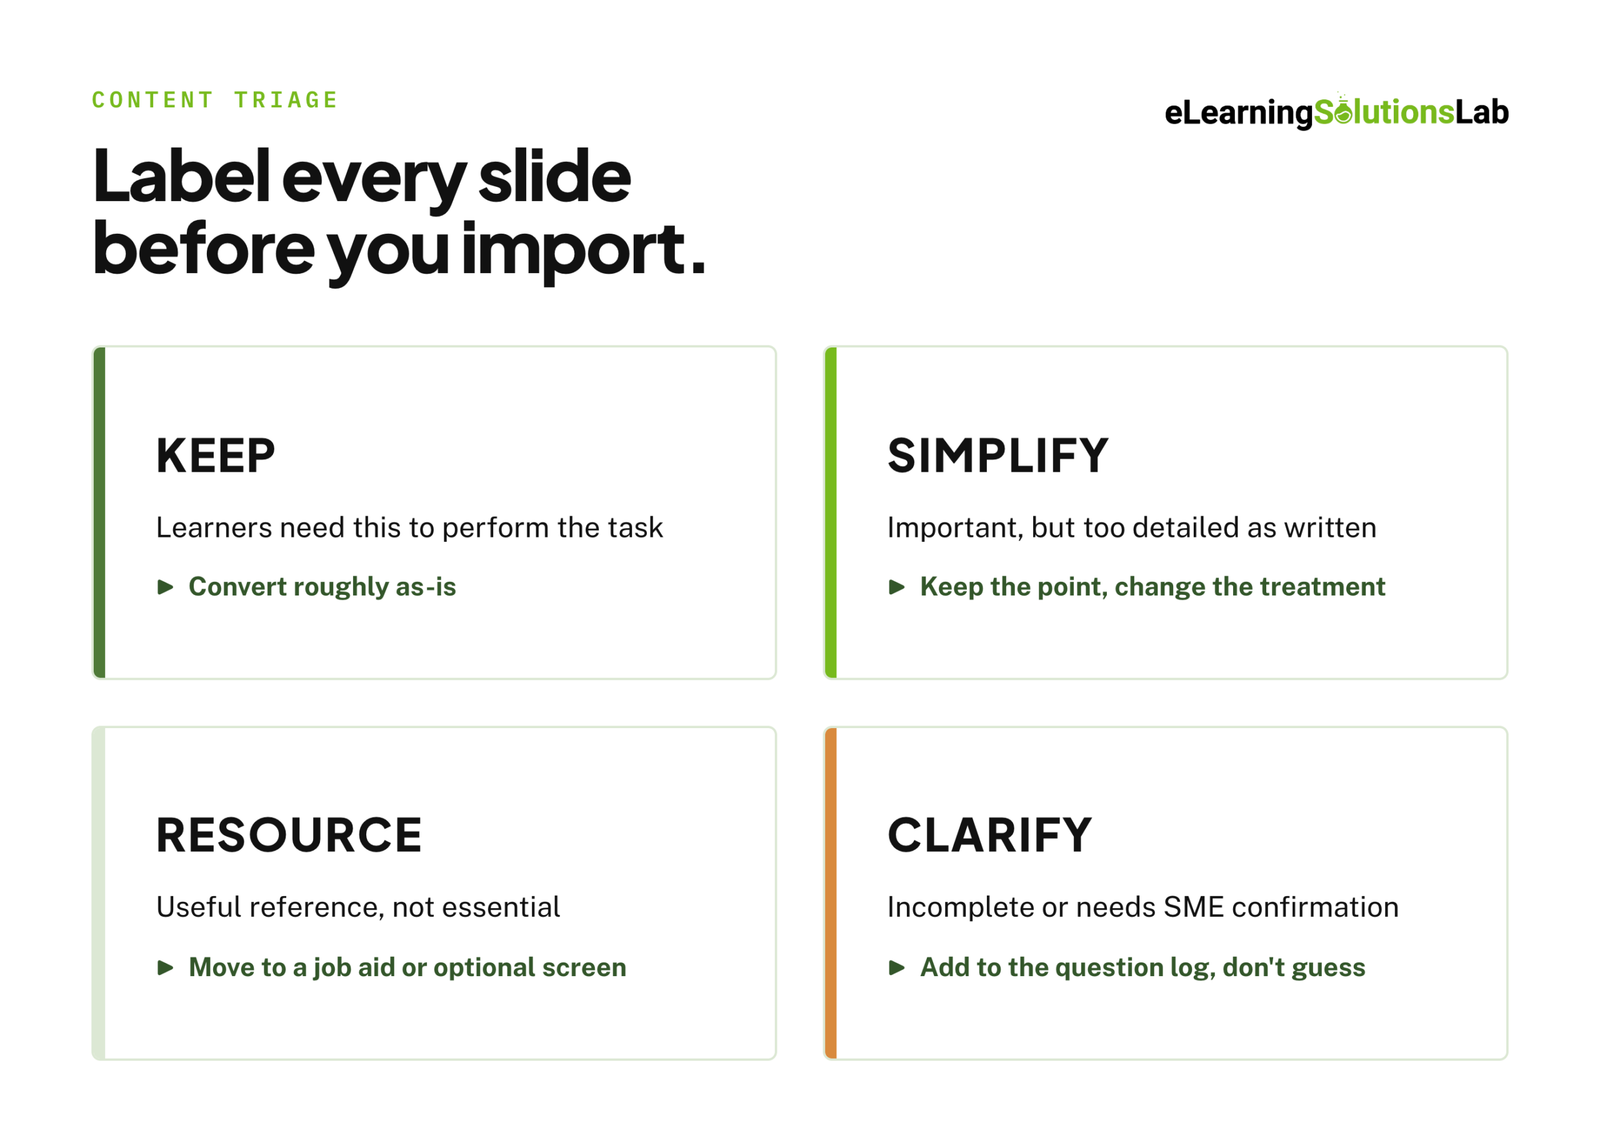 You need to label every slide with Keep, Simplify, Resource, or Clarify, then batch the Clarify questions to the SME, and split overloaded slides by instructional functions: Anchor, Practical Context, Engagement, and Example.
The output you need here is content inventory and question logs. The labels and the split are explained in full further down this page.
Step 4: Decide How the Learning Works
These include objectives with measurable verbs. Then for each one: know what evidence proves it, what assessment produces that evidence, and what specific method gets learners there.
The verb will drive all three: Identify needs a labeling or selection task, Sequence needs an ordering activity, and Select in context needs a scenario. That last one is why decision-heavy content ends up as scenario based elearning services rather than a multiple-choice quiz – the objective verb decides the format, not preference.
Then, you can map it: modules → lessons → screens, where each screen carries a purpose, a linked objective, and a source slide number it came from. Keeping that slide reference costs nothing at all, but will save an entire review cycle – your SME checks your interpretation against the original, and when the source updates, you know exactly which screens get affected.
Step 5: Storyboard
Now, you need to write screen specs: screen number and title, purpose, objective, SME reference, visual layout, on-screen text, voice-over, interaction, programming and animation notes, assets, accessibility notes.
Two of which are essential: Interaction must really be chosen from the screen’s purpose, not added to make the screen clickable – for instance, if the screen is pure explanation, you can write “Next button only” and move on.
Accessibility notes also belong here, given that retrofitting keyboard access into a finished drag-and-drop may usually mean rebuilding it.
Then, you can now run QA gates before a single screen is built: instructional design review, SME accuracy review, client review, accessibility check, technical feasibility check, and version approval.
This is the stage that separates a converted deck from a course, and it’s the stage most conversion projects skip. It’s also the bulk of what instructional design services exist to cover.
Step 6: Build
This is the step where your deck enters an authoring tool. There are two tools you can use for building an eLearning course:
iSpring will keep the deck as the project, so you work inside PowerPoint and layer on it with quizzes, narration, and interactions. Fastest route, to be honest, when your storyboard mostly preserves the original slides.
Another authoring tool is articulate elearning – Storyline, which you can import slides as editable scenes. This is where you’ll have more setup, layout shifts to fix, and no residual slideshow feel.
The trade-off is real. iSpring preserves your deck, which is a benefit right up until the deck is the problem. Storyline costs you more setup and gives you a course that no longer looks like a slideshow.
Step 7: Publish and Test
SCORM 1.2 unless your LMS says otherwise, and where you can set the completion rule deliberately, like viewing every screen is not the same, really, as passing the assessment.
And you need to test in SCORM Cloud before your LMS: it really has to separate a broken package from an LMS configured to ignore a working one.
Confirm three things specifically: completion fires, scores post, and resume works when a learner closes the browser mid-module. Only then upload for real.
Pro Tip
If a deadline forces you to cut a step, cut step 6, not steps 1 to 5. A thin build from a good storyboard is a usable course that improves later. A polished build from no storyboard is a slideshow with a progress bar, and the only fix is starting again.
How to Triage a Deck Before You Build
Most conversion guides start at import, which assumes every slide deserves to become a screen. It doesn’t. A 60-slide deck usually holds around 35 slides of real instructional content, 15 that only worked because someone was talking over them, and 10 that are reference material pretending to be teaching.
Sort before you build. Give every slide one of four labels.
| Label | What It Means | What You Do With It |
|---|---|---|
| Keep | Learners need this to perform the task | Convert roughly as-is |
| Simplify | Important, but too detailed or too technical as written | Keep the point, change the treatment |
| Resource | Useful reference, not essential to the course | Move to a job aid, download, or optional screen |
| Clarify | Incomplete, confusing, or needs SME confirmation | Add to the question log – don’t guess |
Two things make this work in practice.
Batch the Clarify items and send them once. SMEs answer one email with eight specific questions. They do not answer eight emails, and they especially don’t answer “can you review this?”. Record the answers against the slide, then update the label – most Clarify items become Keep or Simplify once you know what the SME actually meant.
Expect one slide to become several screens. A single SME slide often carries three instructional jobs at once: a definition, an explanation of where it shows up at work, and a prompt that makes the learner think. In the room, the presenter delivered those in sequence. On screen, stacked together, they compete for attention.
Split them by function:
- Anchor – introduce the concept or mental model
- Practical context – where it appears and why it matters at work
- Engagement – ask the learner to recall, predict, or choose
- Example – show it in a realistic situation
One dense slide becomes three or four light ones. The content is unchanged; the cognitive load drops sharply. Screens with no purpose and no linked objective get deleted here, in a spreadsheet, rather than later in the authoring tool.
If the source is a shared drive full of decks rather than one file, this triage is the whole first phase of a legacy content conversion services project, and doing it badly is the reason those projects overrun.
What Breaks on Import and How to Fix It
Every authoring tool advertises PowerPoint import. None of them import everything. These are the failures that surface after the deck is already inside the tool, when fixing them is most expensive.
| What Breaks | What Actually Happens | Fix |
|---|---|---|
| Fonts | Anything not installed on the build machine silently substitutes, breaking line lengths and layout | Embed or substitute before import, and standardise on web-safe fonts for the build |
| Custom animations | Motion paths, triggers, and sequenced builds flatten or disappear | Rebuild in the authoring tool’s timeline, where you get sync control anyway |
| SmartArt and grouped shapes | Imports as a flat image or fragments into ungrouped, unaligned objects | Flatten deliberately before import, or rebuild as native shapes |
| Embedded video and audio | Linked media drops entirely; embedded media re-compresses and loses quality | Keep source files separate and re-insert them in the authoring tool |
| Speaker notes | Dropped or dumped into a notes field nobody reads again | Extract into the storyboard first – they’re usually your narration draft |
| Hyperlinks and action buttons | Slide-to-slide links point at slides that no longer exist after triage | Rebuild navigation as triggers against the new screen map |
| Slide dimensions | Canvas mismatch shifts every element by the same wrong amount | Fix the master and story size first, or you’ll fix the same problem 60 times |
| Tables and charts | Import as static images, so text is unsearchable and unreadable to screen readers | Rebuild the ones that carry meaning; leave decorative ones as images with alt text |
Two rules save most of this pain. Save a copy and never convert the master file. And delete everything labelled Resource or removed before import, because converting slides “just in case” costs build time and adds screens learners have to click past.
Which Standard to Publish In
Publishing format is a five-minute decision that’s expensive to reverse, because it determines what your LMS can actually record.
SCORM 1.2 is the default answer. It’s the most widely supported version across every LMS still in service, and it records completion, pass or fail, score, and time. Publish here unless you have a specific reason not to.
SCORM 2004 adds sequencing rules and finer-grained completion versus success reporting. Useful for multi-module courses with prerequisites and branching between them. Support is good but not universal, so confirm with your LMS first.
xAPI records activity beyond the course itself – what the learner did inside the module, what they did after it, and activity outside the LMS entirely. It needs a Learning Record Store, which is a decision above the course level, so it’s usually driven by the organisation rather than the project.
cmi5 is the bridge: xAPI’s data model with the launch and tracking discipline of SCORM. It’s the direction of travel, though LMS support is still uneven enough that it’s rarely the safe choice for a single conversion project.
For most PowerPoint conversions, SCORM 1.2 with a deliberate completion rule covers the requirement. Set that rule consciously – viewing every screen and passing the assessment are two different claims, and defaults usually pick the weaker one for you. If you’re deciding this for a whole library rather than one module, how to create scorm content covers the packaging side in more depth.
Pro Tip
Test the package in SCORM Cloud before it ever touches your production LMS. It’s the only way to tell a broken package apart from an LMS configured to ignore a working one – and those two problems look identical from inside your LMS reporting.
Accessibility Requirements You Can’t Add Later
For US enterprise and public-sector buyers, WCAG 2.1 AA or Section 508 conformance is a procurement requirement, not a nice-to-have. Most conversion guides give it one line. That’s how projects end up rebuilding finished modules.
Decide these at storyboard stage, per screen:
- Reading order. PowerPoint’s visual layout and its underlying object order are often different. Screen readers follow the object order, so check and fix it per screen.
- Alternative text on every meaningful image, and explicitly marked decorative on the rest. An unmarked decorative image is noise in a screen reader.
- Captions and transcripts for all narration and video. If narration carries content that isn’t on screen, the transcript isn’t optional.
- Colour contrast at 4.5:1 for body text. Brand palettes designed for projection frequently fail on a laptop screen.
- No meaning carried by colour alone. “The red items are mandatory” fails immediately.
- Keyboard access and visible focus for every interaction. This is the one that forces rebuilds – drag-and-drop and hover-reveal need a keyboard-operable alternative designed in from the start.
- Learner-controlled timing. No auto-advance that outruns a slower reader, and no time limits that aren’t instructionally necessary.
Accessibility is a design decision, not a QA pass. Deciding it during storyboarding costs hours; retrofitting it after development costs a rebuild. Accessible elearning goes deeper on the standards and how to evidence conformance.
The import takes four clicks. The other six steps take the project.
We convert PowerPoint decks into courses that hold up without a facilitator: triage the slides against the actual performance problem, write the storyboard, build in your tool of choice, and hand back a tested SCORM package with accessibility built in rather than bolted on. Send us the deck and what your LMS needs to track, and we’ll scope it.
What Conversion Actually Costs
Almost nothing published on this topic tells you what a conversion costs. The numbers move by market and by complexity, but the structure doesn’t, and knowing the structure is what lets you compare two quotes that look nothing alike.
The Three Cost Lines
Tooling. An annual authoring license, and an LMS you’re probably already paying for. This is the smallest line and the one people fixate on.
Design and build time. The real cost, and it doesn’t scale with slide count. It scales with how much instructional design the deck is missing. A well-structured deck with clean narration notes converts fast. A 90-slide data dump with no objectives is a course-design project wearing a conversion label.
Review and revision. SME accuracy review, client review, accessibility check, and the revision rounds that follow. Networks and agencies both underestimate this because the hours belong to people who already have jobs.
DIY, Freelancer, or Agency
Do it in-house when you already own the license, someone has the design skill, and the deck is in decent shape. Cheapest in cash, most expensive in calendar time if that person has another full-time role.
Hire a freelancer for a single module or a spike in volume. Works well when your storyboard is already written, because you’re buying build hours rather than design judgment. Works badly when you hand over a raw deck and hope.
Use an agency when you’re converting a library rather than a module, when accessibility conformance has to be evidenced, or when the output carries your brand to a client. You’re buying process and throughput, and the per-module cost usually drops as volume rises. Elearning outsourcing covers how those engagements are normally structured, and elearning development costs breaks down what actually moves the number on a custom build.
A Rule of Thumb for Build or Buy
If you’ll convert fewer than roughly five modules a year, buying the license and the learning curve rarely pays back. Between five and twenty, in-house starts to make sense if you have a dedicated person. Above that, you’re running a production function, and the question stops being cost per module and becomes throughput, consistency, and who covers you when that person leaves.
One more variable: if the deck is one of forty sitting on a shared drive, price the library, not the module. Unit costs fall sharply once templates, narration standards, and review gates are established, which is the same economics behind rapid elearning services.
Five Mistakes That Make a Converted Deck Fail
- Converting every slide. The deck’s structure was built for a room with a presenter in it. Keeping all 60 slides preserves a structure that no longer has anyone holding it together.
- Adding interactions to make screens clickable. A click-to-reveal on a screen that should just explain something adds friction and no learning. Interaction follows purpose, or it’s decoration.
- Narrating the on-screen text. Reading aloud what the learner is already reading splits attention and slows comprehension. Put the detail in one channel and the support in the other.
- Treating completion as evidence of learning. A 100% completion report on a click-through module proves people clicked. If the objective says learners must select the right option in a real situation, the assessment has to ask them to do exactly that.
- Leaving accessibility to the end. It isn’t a QA step. It’s a set of design decisions, and the cost of making them late is a rebuild, not a fix.
The pattern underneath all five is the same: the deck gets treated as the course rather than as source material. Fix that assumption and most of the rest follows. How to create effective elearning courses covers the design side beyond conversion specifically.
Related Services
- convert powerpoint to elearning services – your deck, storyboarded and built into a tested SCORM package.
- ilt to elearning services – when the facilitator was carrying half the content.
- instructional design services – objectives, assessment, and storyboard before anything gets built.
- legacy content conversion services – for a shared drive full of decks rather than a single file.
- rapid elearning services – when volume and deadline matter more than bespoke build.
- custom elearning development services – when the deck is a starting point, not a specification.
- best elearning authoring tools – if you haven’t committed to a tool yet.
The Author

Book A Discovery Call
Our Learning Advisors are happy to walk you through your project step-by-step — content, timeline, and fixed pricing.
Get Your Free QuoteNo obligation — just a focused conversation. Proposal within 24 hours.
You may also like
Staff Augmentation for L&D: Buyer’s Guide, Costs & Fit
L&D staff augmentation is a staffing model where an external eLearning…
eLearning for Franchises: A Buyer’s Guide to Training a Network You Don’t Directly Employ
A franchisor carries full responsibility for how the brand shows up in every…